MY CANON EOS R1 CONFIGURATION
Here is a summary of the key configurations I…
In this blog post I describe the photo editing process I am using when shooting and editing images from card. The process is suitable for editorial work, especially news and sports type of photography. I rely on PhotoMechanics and PhotoShop CC (including its RAW converter) software. So, if you use different software tools, your process may look differently. My approach is most probably not appropriate for creative work. Also, I use a different process when transmitting photos directly from the camera, using remote cameras, and / or editing photos from someone else (which I may describe in an upcoming blog post).
I you have ideas about how to adjust and / or improve this process, or if you disagree and have a better alternative, simply leave your input in the comment section below. Please note that all comments will be moderated, and only relevant ones will be posted.
Before shooting any photo, I complete the following steps:
Network -> GPS settings -> Auto time setting: auto update), but I never succeeded in doing so.Network -> Network settings: enable -> Connection Sync time between cameras), but you need to use an Ethernet cable or the external WiFi transmitter to do so.CD3A and CD3B on my two Canon EOS 1 D-X Mark III cameras.These five steps complete my preparation routine.
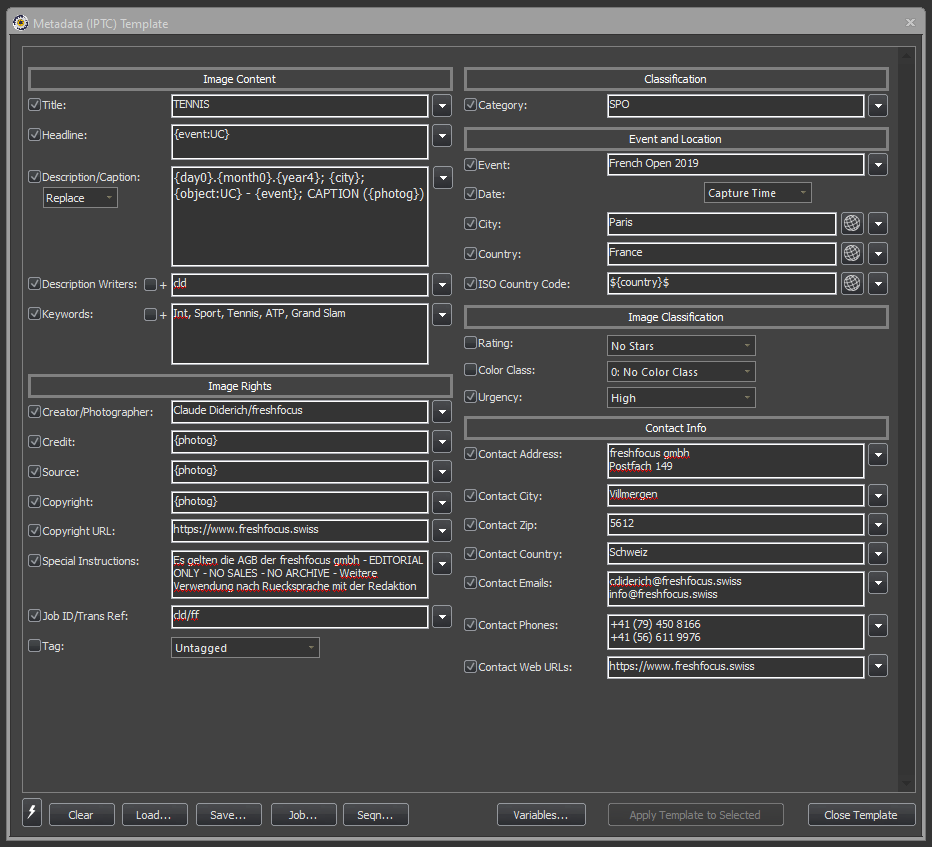
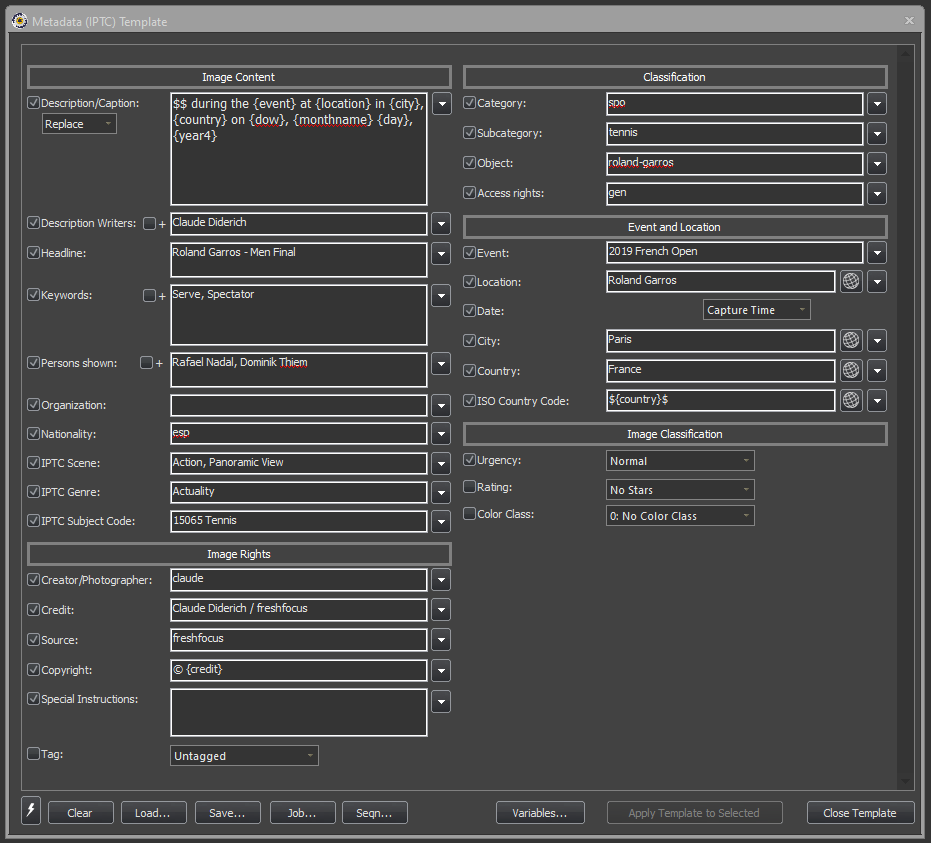
Figure 1. Two sample IPTC templates. I recommend configuring PhotoMechanics in such a way that it only shows those IPTC fields that you need to fill-out (you can do so in Edit Preferences -> Accessibility -> Metadata (IPTC) Dialogue). Note that I use the $ character for code replacements and have a code replacement table translating country names into country codes.
When arriving on location, I scout the environment for possible and permitted photo positions, especially screening backgrounds, lights, etc.
Before the event I am covering starts, I double-check the settings on all my cameras, notably, white balance, ISO setting, exposure, etc. to avoid any surprises. Unless I am in a controlled environment, I let the camera decide what’s best!
While taking photos, I perform the following three steps relevant to the editing process:
I do not do any additional editing on my camera, even though modern cameras would allow to do so!
Once I have taken the pictures I want and are ready to process them, I proceed to ingesting the photos onto my computer. To do so I use PhotoMechanics. In the old day, I removed the card from my camera and copied the photos to my laptop (or desktop) via drag-and-drop. Nowadays I always use the ingest function because it allows automating a first processing step. I iteratively use the following process for each card which contains images.
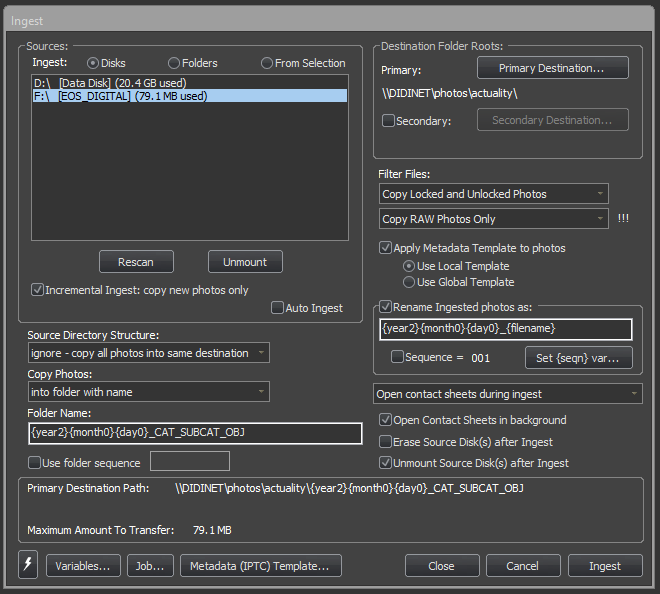
Figure 2. Ingesting dialogue (File -> Ingest) showing the options that I use.
Sources:
Ingest: Disks). I use incremental ingests, that is, only copy new photos.
Destination Folder Roots:
\\DIDINET\photos\actuality. This permits me to easily locate the files afterwards.Filter Files:
Metadata (IPTC) Template…“{year2}{month0}{day0}_{filename}”.
Folder Name:
“{year2}{month0}{day0}_CAT_SUBCAT_OBJ”, where CAT is the category, SUBCAT the subcategory, and OBJ the object identifier.
As I have PhotoMechanics unmount the source disk / card after completing the ingest, I can remove the card from the reader without any problem. But first, I double-check that the ingest completed successfully by having a first look at the images. If everything looks fine, I remove the card from the reader, put it back into the camera, and format the card in the camera. Only then do I proceed to ingesting photos from a second camera, if any, using the same ingest process.
Following the recommendations from PhotoMechanics, I do not have the application erase the images on the card after ingesting them. Although that would be faster (avoiding having to format the card in the camera), they recommend against it as a step of precaution.
I open the folder in which I have ingested the photos and sort the images by capture time.
Name + 2 Labels, with the first label being {category}_{suppcat1}_{object} and the second label {event}, as contact sheet preferences for thumbnails as seen in Figures 3 and 4.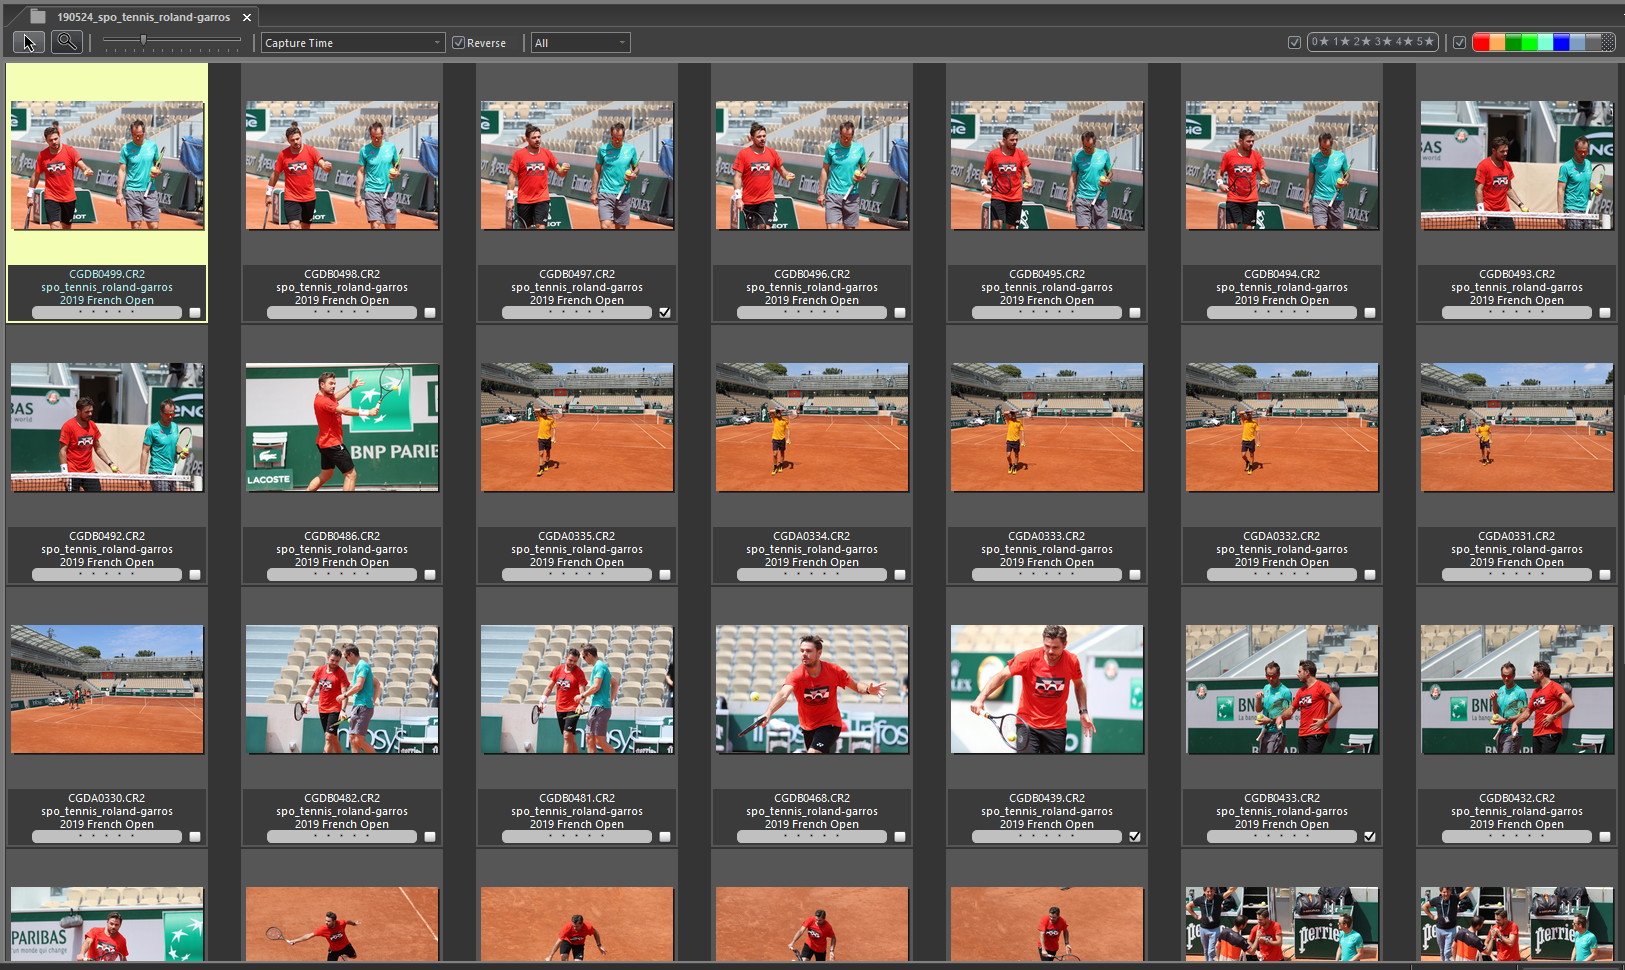
Figure 3. Contact sheet in PhotoMechanics showing the photos ingested with the metadata IPTC template applied to.
Next, I circle through the images and crop those images that I want to process further. I especially check that the images cropped are sharp. Once, I have completed the selection and cropping process, I move to the image processing step of my editing process.
If I am in a hurry, I only focus on the tagged images, by displaying only the tagged images, as shown in Figure 4.
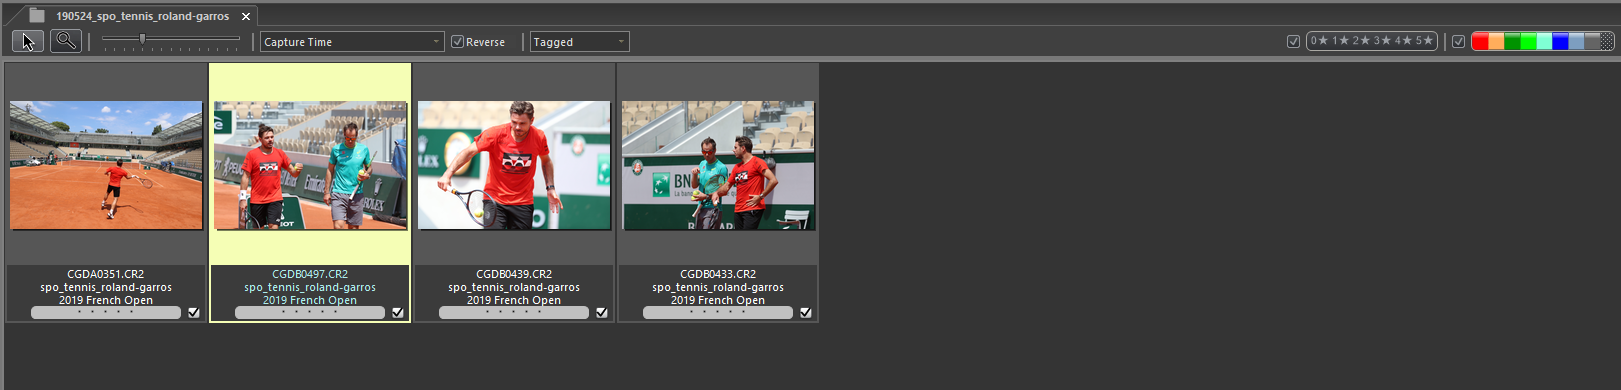
Figure 4. Contact sheet in PhotoMechanics showing the subset of tagged photos ingested with the metadata IPTC template applied to.
{crop} and select all cropped images that have not yet been color-coded.CTRL+E (Image -> Edit Photos).AP Code of Ethics
AP pictures must always tell the truth. We do not alter or digitally manipulate the content of a photograph in any way.
The content of a photograph must not be altered in Photoshop or by any other means. No element should be digitally added to or subtracted from any photograph. The faces or identities of individuals must not be obscured by Photoshop or any other editing tool. Only retouching or the use of the cloning tool to eliminate dust on camera sensors and scratches on scanned negatives or scanned prints are acceptable.
Minor adjustments in Photoshop are acceptable. These include cropping, dodging and burning, conversion into grayscale, and normal toning and color adjustments that should be limited to those minimally necessary for clear and accurate reproduction (analogous to the burning and dodging previously used in darkroom processing of images) and that restore the authentic nature of the photograph. Changes in density, contrast, color and saturation levels that substantially alter the original scene are not acceptable. Backgrounds should not be digitally blurred or eliminated by burning down or by aggressive toning. The removal of “red eye” from photographs is not permissible.
On those occasions when we transmit images that have been provided and altered by a source — the faces obscured, for example — the caption must clearly explain it.
Except as described herein, we do not stage, pose or re-enact events. When we shoot video, environmental portraits, or photograph subjects in a studio care should be taken to avoid, misleading viewers to believe that the moment was spontaneously captured in the course of gathering the news. In the cases of portraits, fashion or home design illustrations, any intervention should be revealed in the caption and special instructions box so it can’t be mistaken as an attempt to deceive.
After having processed the images in PhotoShop, I return to PhotoMechanics and sort the images by {type}, now focusing on the edited JPG files.
I edit the IPTC data for each photo by completing the caption, adding keywords, person shown, etc. and checking that all data is correct. If the image has an associated sound, I take that into account when writing the caption. I heavily rely on code replacements to make caption writing quick and easy – and to avoid typing mistakes.
After having written all captions, I re-read them and correct typing mistakes. It is very important to get your spelling right. As they say – you never get a second chance to make a first impression. Unfortunately, sometimes I jump over this step, and it comes to haunt me later!!!
CTRL+U (File -> Upload).cd-”), ensuring that the filenames of the images transmitted are unique.Figure 5. File upload dialogue with settings used to transmit all selected photos.
As a final tip, I have defined the info text shown next to each image when in the preview window as shown in Figure 6.
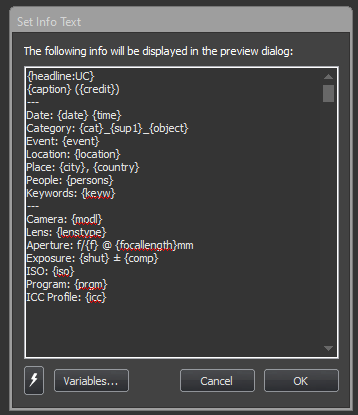
Figure 6. Info Text configuration.